Security
This section is a refresher that provides an overview of the main concepts of security in Kubernetes. At the end of this section, please complete the exercises to put these concepts into practice.
Authentication & Authorization 🔗
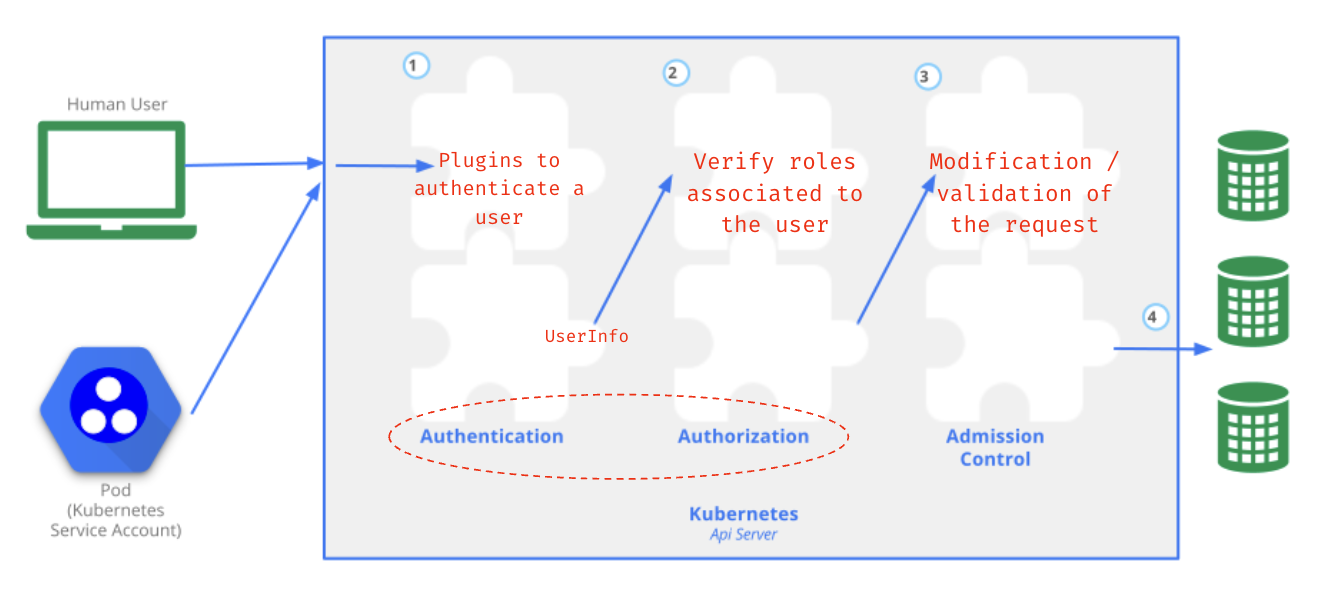
Authentication: several methods 🔗
Kubernetes offers multiple methods to authenticate users against the API Server:
- Client certificates
- Bearer tokens
- HTTP basic auth
- OpenID Connect
- Proxy
To authenticate an application running in a Pod, Kubernetes relies on ServiceAccounts resources.
Authentication: admin kubeconfig 🔗
When we create a cluster, an admin kubeconfig file is generated, similar to the following one.
apiVersion: v1
clusters:
- cluster:
    certificate-authority-data: LS0tLS1CR…0tLS0tCg==
    server: https://10.55.133.216:6443
  name: kubernetes
contexts:
- context:
    cluster: kubernetes
    user: kubernetes-admin
  name: kubernetes-admin@kubernetes
current-context: kubernetes-admin@kubernetes
kind: Config
preferences: {}
users:
- name: kubernetes-admin
  user:
    client-certificate-data: LS0tLS1CRU...0tLS0tCg==
    client-key-data: LS0tLS1CRU...0tLS0tCg==
This file contains a public/private key pair used for authentication against the API Server. We can use OpenSSL commands to get details about the public key (x509 certificate).
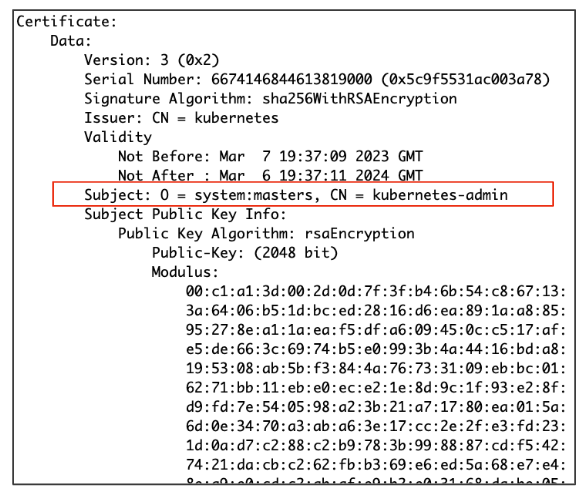
The following screenshot shows the Subject used in the certificate:
- “O = system:master” indicates this certificate is related to the system:master group
- “CN= kubernetes-admin” indicates it is related to the kubernetes-admin user
Using this certificate to communicate with the API Server will authenticate us as the kubernetes-admin belonging to the system:master group. This is a specific case, as the group system:master provides full access to the cluster.
The admin kubeconfig file is not the only kubeconfig file generated during the cluster creation step. As we’ll see in the next section, each component that needs to communicate with the API Server has its kubeconfig file (and associated access rights).
Authentication: control-plane components 🔗
The following picture illustrates how the control plane components communicate with each other.
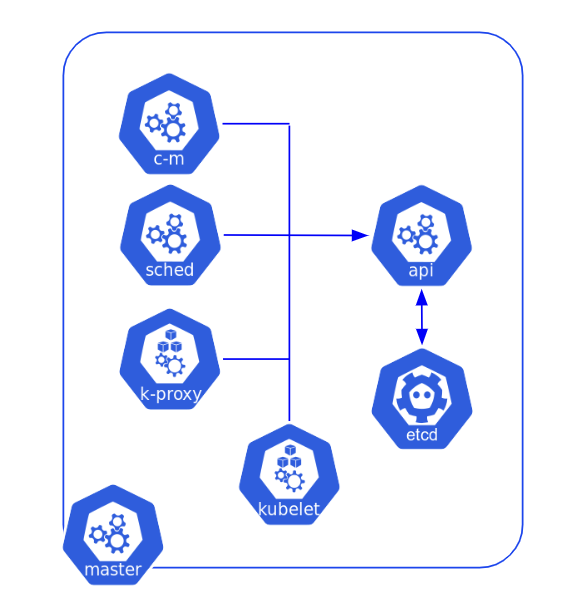
The /etc/kubernetes folder contains the following files to ensure this communication is secured.
- kubeconfig files to authenticate internal components against the API Server
- Certificates and private keys to ensure communication is using TLS; they are located in /etc/kubernetes/pki
$ sudo tree /etc/kubernetes
/etc/kubernetes
├── admin.conf
├── controller-manager.conf
├── kubelet.conf
├── manifests
│   ├── etcd.yaml
│   ├── kube-apiserver.yaml
│   ├── kube-controller-manager.yaml
│   └── kube-scheduler.yaml
├── pki
│   ├── apiserver-etcd-client.crt
│   ├── apiserver-etcd-client.key
│   ├── apiserver-kubelet-client.crt
│   ├── apiserver-kubelet-client.key
│   ├── apiserver.crt
│   ├── apiserver.key
│   ├── ca.crt
│   ├── ca.key
│   ├── etcd
│   │   ├── ca.crt
│   │   ├── ca.key
│   │   ├── healthcheck-client.crt
│   │   ├── healthcheck-client.key
│   │   ├── peer.crt
│   │   ├── peer.key
│   │   ├── server.crt
│   │   └── server.key
│   ├── front-proxy-ca.crt
│   ├── front-proxy-ca.key
│   ├── front-proxy-client.crt
│   ├── front-proxy-client.key
│   ├── sa.key
│   └── sa.pub
├── scheduler.conf
└── super-admin.conf
For information purposes, the following table gives the subject of the certificates embedded in each kubeconfig file.
| file | subject |
|---|---|
| admin.conf | O = system:masters, CN=kubernetes-admin |
| super-admin.conf | O = system:masters, CN = kubernetes-super-admin |
| controller-manager.conf | CN = system:kube-controller-manager |
| kubelet.conf | O = system:nodes, CN = system:node:NODE_NAME |
| scheduler.conf | CN = system:kube-scheduler |
Authentication: ServiceAccount 🔗
When a Pod needs to access the API Server, it must use a resource of type ServiceAccount. The following YAML specification defines a ServiceAccount named viewer.
apiVersion: v1
kind: ServiceAccount
metadata:
  name: viewer
We can manually create a token for this ServiceAccount.
kubectl create token viewer
This command returns a token similar to the following one:
eyJhbGciOiJSUzI1NiIsImtpZCI6IlRwSU85ZXdWUFp0SlpjaDBjekl6ZTNaNGRuUTZSVDFiV2dyWVhqbGwyRDAifQ.eyJhdWQiOlsiaHR0cHM6Ly9rdWJlcm5ldGVzLmRlZmF1bHQuc3ZjLmNsdXN0ZXIubG9jYWwiXSwiZXhwIjoxNzQ1NDk5OTUyLCJpYXQiOjE3NDU0OTYzNTIsImlzcyI6Imh0dHBzOi8va3ViZXJuZXRlcy5kZWZhdWx0LnN2Yy5jbHVzdGVyLmxvY2FsIiwianRpIjoiMTE1OTgzZjYtOWE3Ny00ZmY1LWE4OGQtMTc2ODg3N2YxYmE3Iiwia3ViZXJuZXRlcy5pbyI6eyJuYW1lc3BhY2UiOiJkZWZhdWx0Iiwic2VydmljZWFjY291bnQiOnsibmFtZSI6InZpZXdlciIsInVpZCI6IjY2NmE3NWNkLWRkZGUtNDAzYi1iZmE0LWM0MjIxNWI1OTA1YiJ9fSwibmJmIjoxNzQ1NDk2MzUyLCJzdWIiOiJzeXN0ZW06c2VydmljZWFjY291bnQ6ZGVmYXVsdDp2aWV3ZXIifQ.CGYbqWDj3KaEGPgU_pV6sL1wRf3IU56AlpljLxUO6tvpbkK7Z6le8FI5zdwp_04LgcWnHLo5-hsZiyJxmeKYXhsb3CASkI0Vvumfsb8kahIiJxVXIE-PfzKNlxampuubc3mG4q9h1s0M_Y-PubMdl4TkBoLMjujxbsTtPqpD2joxyZ2YB7ys7DiGp-BjQwXwwaxOniSwd0l_tyEAlX0UTy0qjmjjuMBJKQTLDzwPJXWCAXbeAMULsnsosS21sWyimmVMz6HQ8S4MttkMSg8eZ1IW-LPPn3Hfs0lBLRYeVRBn6qe4l7qxgCfgj57GfYgEWGy5BO9uaAAGcHVBdTacAQ
From jwt.io we can get the content of this JWT token and see that it authenticates the ServiceAccount named viewer within the default Namespace. We could use this token manually to call the API Server, but when a Pod is using a ServiceAccount a dedicated token is automatically created and mounted into its containers’ filesystem.

Authorization: RBAC (Role Based Access Control) 🔗
In the previous section, we covered the authentication mechanisms that allow the API Server to verify a user’s or an application’s identity. Now, we’ll look at the resources used to grant permissions.
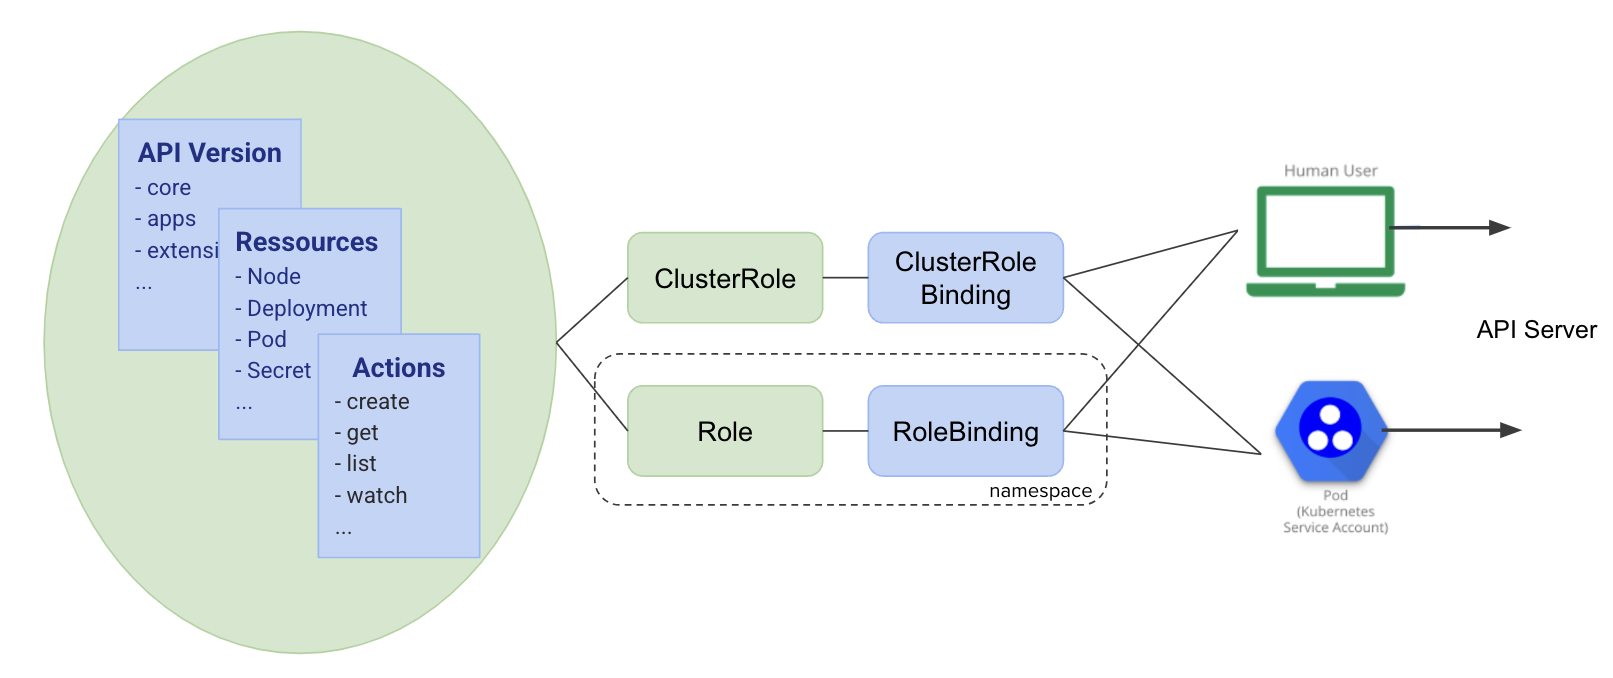
Authorization: Role / RoleBinding 🔗
A Role resource defines permissions in a Namespace. A RoleBinding associates this Role with an identity which can be a user, a group, or a ServiceAccount.
The following example defines a Role that grants read-only access to Pods in the development Namespace. The RoleBinding associates this Role with a user named bob: if a user has a certificate whose subject is bob, then he will be granted the permission to list and get information about Pods in the development Namespace.
apiVersion: rbac.authorization.k8s.io/v1
kind: Role
metadata:
  namespace: development
  name: dev-pod-reader
rules:
- apiGroups: [""]
  resources: ["pods"]
  verbs: ["get", "list"]
---
apiVersion: rbac.authorization.k8s.io/v1
kind: RoleBinding
metadata:
  name: dev-pod-reader
  namespace: development
subjects:
- kind: User
  name: bob
  apiGroup: rbac.authorization.k8s.io
roleRef:
  kind: Role
  name: dev-pod-reader
  apiGroup: rbac.authorization.k8s.io
Authorization: ClusterRole / ClusterRoleBinding 🔗
The ClusterRole and ClusterRoleBinding resources are similar to the Role and RoleBinding ones, except that they are global to the cluster instead of being limited to a Namespace.
The following specifications define a ClusterRole which grants read access to resources of type Secret in the entire cluster and a ClusterRoleBinding that associates this ClusterRole to the ServiceAccount named viewer. If a Pod uses the viewer ServiceAccount, then its containers will have the right to read the cluster’s Secrets.
apiVersion: rbac.authorization.k8s.io/v1
kind: ClusterRole
metadata:
  name: secret-reader
rules:
- apiGroups: [""]
  resources: ["secrets"]
  verbs: ["get", "list"]
---
apiVersion: rbac.authorization.k8s.io/v1
kind: ClusterRoleBinding
metadata:
  name: dev-pod-reader
subjects:
- kind: ServiceAccount
  name: viewer
  apiGroup: rbac.authorization.k8s.io
roleRef:
  kind: ClusterRole
  name: secret-reader
  apiGroup: rbac.authorization.k8s.io
Authorization: usage of a ServiceAccount 🔗
To use a ServiceAccount, we can define the serviceAccountName property in the Pod’s specification as follows.
apiVersion: v1
kind: Pod
metadata:
  name: monitoring
spec:
  containers:
  - image: lucj/mon:1.2
    name: mon
  serviceAccountName: viewer
SecurityContext 🔗
The SecurityContext property defines privileges and access controls at the Pod or container level.
When defined at the Pod level, we can use the following properties:
- fsGroup: specifies a group ID that all containers in the Pod use for accessing mounted volumes
- runAsGroup: sets the primary group ID for all container processes
- runAsNonRoot: ensures that containers must run as a non-root user
- runAsUser: sets the user ID to run all processes in the Pod
- seLinuxOptions: defines SELinux labels to apply to the Pod
- supplementalGroups: specifies additional group IDs for processes in the Pod
- sysctls: allows setting kernel parameters (sysctls) for the Pod
When defined at the container level, we can use the following properties:
- allowPrivilegeEscalation: indicates whether a process can gain more privileges than its parent
- capabilities: adds or removes Linux capabilities for the container process
- privileged: grants the container full access to the host
- procMount: controls how /proc is mounted in the container
- readOnlyRootFilesystem: if set to true, makes the container’s root filesystem read-only
- runAsGroup: sets the primary group ID for the container process
- runAsNonRoot: ensures the container runs as a non-root user
- runAsUser: sets the user ID to run the container process
- seLinuxOptions: applies SELinux labels to the container
Example 🔗
The following Pod specification defines a securityContext property both at the Pod and at the container level.
apiVersion: v1
kind: Pod
metadata:
  name: demo
spec:
  securityContext:
    runAsUser: 1000
    runAsGroup: 3000
    fsGroup: 2000
  containers:
  - name: api
    image: registry.gitlab.com/web-hook/api:v1.0.39
    securityContext:
      allowPrivilegeEscalation: false
      readOnlyRootFilesystem: true
      runAsUser: 10000
      runAsNonRoot: true
      seccompProfile:
        type: RuntimeDefault
      capabilities:
        drop:
        - ALL
Network Policy 🔗
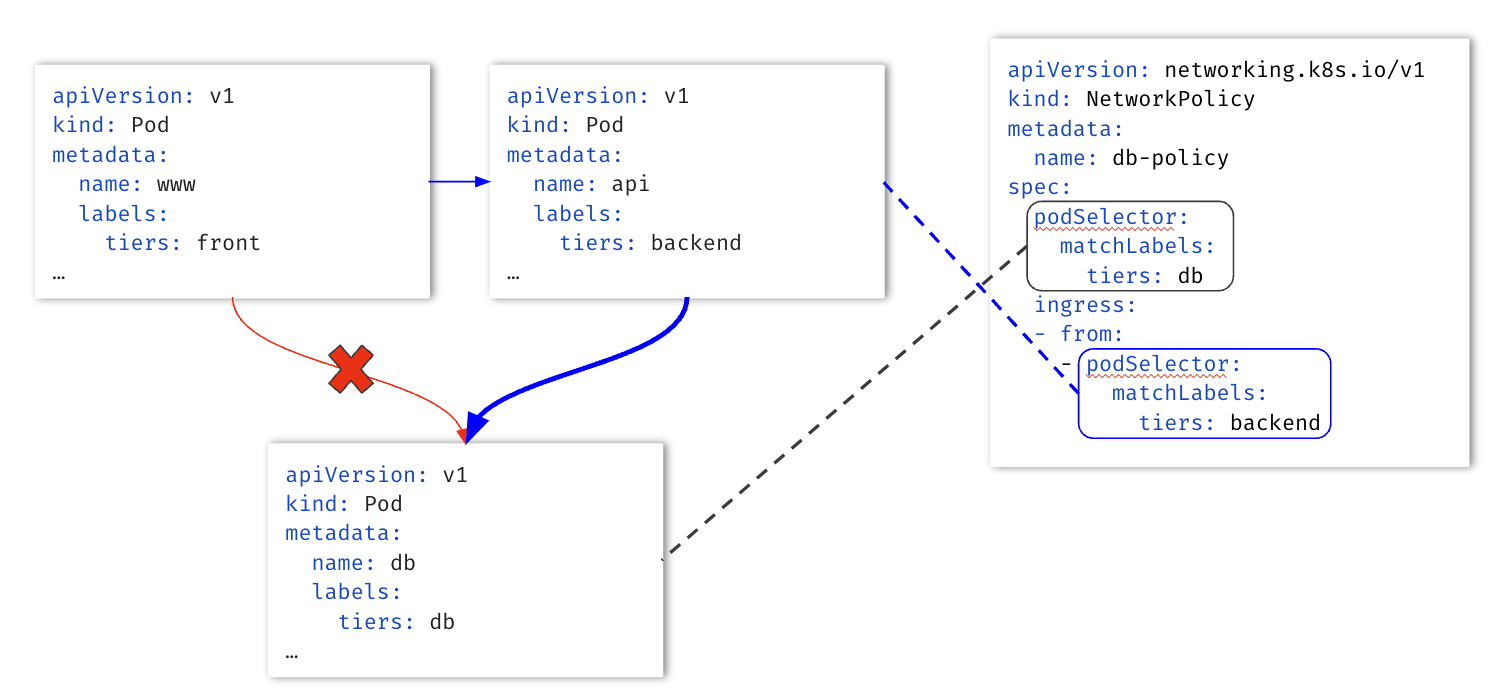
By default, Pods created in separate Namespaces can communicate with each other. To control Pod-to-Pod communications, Kubernetes has a NetworkPolicy resource. Based on Pod’s labels, it can restrict ingress and egress communication for the selected Pods.
The example below defines a NetworkPolicy restricting the database Pod to receive traffic from the backend Pod only.
The example below (from Kubernetes documentation) is more complex. It illustrates the full capabilities of NetworkPolicies.
apiVersion: networking.k8s.io/v1
kind: NetworkPolicy
metadata:
  name: test-network-policy
  namespace: default
spec:
  podSelector:
    matchLabels:
      role: db
  policyTypes:
  - Ingress
  - Egress
  ingress:
  - from:
    - ipBlock:
        cidr: 172.17.0.0/16
        except:
        - 172.17.1.0/24
    - namespaceSelector:
        matchLabels:
          project: myproject
    - podSelector:
        matchLabels:
          role: frontend
    ports:
    - protocol: TCP
      port: 6379
  egress:
  - to:
    - ipBlock:
        cidr: 10.0.0.0/24
    ports:
    - protocol: TCP
      port: 5978
It defines a NetworkPolicy for Pods with the label role: db managing incoming and outgoing traffic for those Pods.
It authorizes incoming traffic from (logical OR):
- Pods with IP addresses in a specific range
- Pods within a namespace
- Pods with specific labels in the current namespace
It also authorizes outgoing traffic to (logical OR):
- Pods with IP addresses in a specific range
- Pods within a specific namespace
- Pods with specific labels in the current namespace
Both incoming and outgoing traffic are limited to specific ports.
Practice 🔗
You can now jump to the Exercises part to learn and practice the concepts above.